With Google documents, you can easily create, share, and edit documents online. Here are a few specific things you can do:
- Microsoft Word, OpenOffice, RTF, HTML or plain text documents, create documents from scratch, and download your online ones.
- documents online simultaneously with anyone you choose, and invite others to view them.
- track of who made changes to a document and when, and roll back to any version.
- documents online to the world, as webpages or post documents to your blog.
- your documents out as attachments.
Creating and saving a Google doc
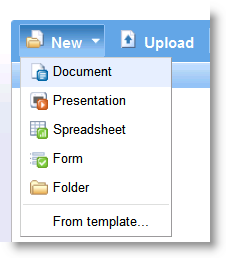
There are different ways of getting started using Google documents: you can create a new online document, you can upload an existing one, or you can use a template from our templates gallery.
Creating and saving a document
To create a new document, go to your Docs list, click the New drop-down menu, and select Document.
As you're working on your document, click the Save button in the top right corner of the document, enter a name for the document in the window that appears, and click OK. Then, you'll see your document in your Docs list.
If you'd like to save and close a document, click the Save & close button.
To save a local copy of a document, you can download it to your computer. To do this, open your document, click the File menu and point your mouse to the Download file as option. You'll see these file types: HTML, RTF, Word, Open Office, PDF, and plain text. Select a file type and click OK in the browser window that appears.
Uploading a document
You can upload existing documents to Google documents at any time.
Here's how:
a. Click the Upload button at the top of the sidebar in your Docs list page.
b. Click Browse and select the document.
c. Click Open.
d. Click Upload File. The uploaded file appears in your Docs list.
Using the templates gallery of a Google doc
If you want to quickly create a document, you can pick one of the templates in our templates gallery. Each template has standard text that you can replace with your own, and preset formatting that you can reuse. Learn more in the templates gallery section of our help center.
You can also access the templates gallery from your document by going to
File > New > From template...
Editing a Google doc
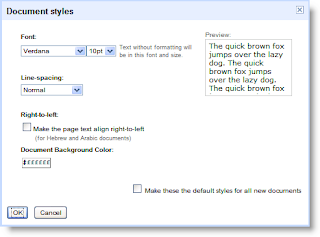
You can change the font or the text size in your document from the toolbar or the 'Document styles' window. To change the spacing of the document, you'll need to open the 'Document styles' window.
From the Google Documents toolbar
To change the font or the text size quickly, select the text you'd like to change and click either the font menu, which lists Verdana, or the text-size drop-down menu, set to 10pt by default. Choose a new font or text size, and the changes are applied to the selected text.
From the 'Document styles' window
Click the Edit drop-down menu and select Document styles. A window appears.
- Here's what you can do from this window:
- Change the font and text size from the drop-down menus.
- Change the spacing in between lines by selecting an option from the Line-space drop-down menu.
- Preview your changes within the window.
- Apply these changes to all your new documents.
Inserting images in a Google Doc
You can enhance your document by inserting an image. Here's how:
1. Click the Insert drop-down menu from the toolbar and select Image.
2. Select 'From this computer' or 'From the web.'
3. Depending on what radio button you selected, choose an image file from your computer, or enter a URL and preview the image.
To specify the size of your image and where it appears in the document, click More image options.
Adding comments in a Google Doc
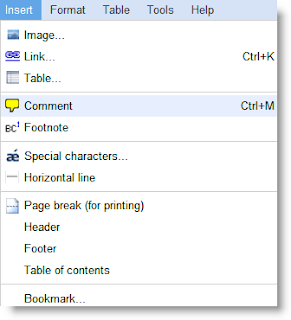
Comments are a handy way of adding notes to your regular document text and are visible to viewers and collaborators. These can be invaluable for communicating with collaborators about specific parts of the document, as well as making notes about changes you've made or would like to make. When you publish your document as a webpage, post it to your blog, or print it, the comments will disappear.
To add a comment to your document, follow these instructions:
1. Place your cursor where you'd like your comment to appear.
2. Click the Insert drop-down menu.
3. Select the Comment icon.
4. Type your comment in the comment field. Each comment is automatically stamped with your username and the date.
5. To print your comments,go to Print settings in the File menu and you'll see a box called Include comments. This box will be checked by default.
A useful tip: If you'd like a shortcut, you can also use the keyboard shortcut, Ctrl + M (Cmd + M for Mac), to insert a comment.
To delete a comment, simply click on it and choose Delete comment from the menu.
Inserting links in a Google Doc
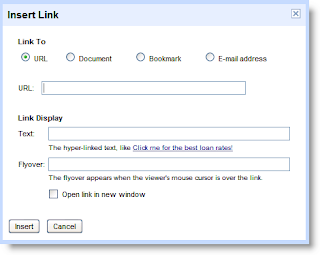
If you want to insert a link to a website or an online document as a reference, follow these steps:
1. Place the cursor where you'd like the link to appear in your document.
2. Click the Link icon from the toolbar, and a window appears.
3. Select 'URL' at the top of the window.
4. Enter the URL.
5. Click Insert Link. The inserted URL will now be visible in your document.
You can also hide the actual URL but still link to the website from specific text in the document. For example, you could choose to link to www.google.com from the words 'search here.' If someone clicks 'search here,' www.google.com opens automatically. To insert a link within text, simply type the text into the first text box in the Link Display section.
Sharing your Google doc
Now that you've created your Google document, you can share it with your friends, family, or coworkers. You can do this from your Docs list or directly from the document.
- From the Docs list, select the checkbox next to the document you want to share (you can also select multiple documents), and click the Share drop-down menu in the toolbar.
- From your document, click the Share drop-down menu in the top right corner of the page.
Then follow these instructions:
1. Select Invite people…
2. Select To edit or To view, depending on your preference.
3. Enter the email addresses or mailing lists that you'd like to add.
4. If you'd like to add a message to your invitation, enter some text and click Send. To skip sending an invitation, click Add without sending invitation. Your collaborators and viewers will still be able to access the document from their Docs lists, but won't receive an email invitation.
In the Share dialog, you can also check who has access to your document, remove collaborators and viewers, and change editing rights.
Note: * You can explicitly share your document with up to 200 combined viewers and collaborators; however, if you publish your document, anyone will be able to access it. * Up to 10 people may simultaneously edit and/or view a document.
Collaborating a Google Doc
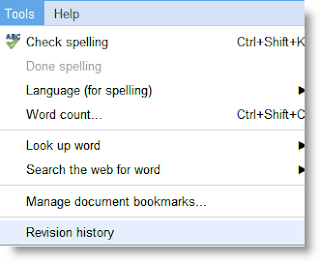
While you and your collaborators are editing a document, you can keep track of changes (and of the person who made them), and even revert to an older version by using 'Revision history.' From your document, select the Tools drop-down menu and click Revision history.
On the next page, you'll see a list of the revisions, the date and time each was last edited, and the changes made. You can also compare two revisions at a time.
If you change your mind about the most recent edits you or your collaborators made to the document, simply revert to an older version. Here's how:
1. Click any revision from the list you see. If you select the wrong one, you can click Older or Newer until you find the version you want.
2. Click Revert to this one on the right side of the page.
Your document is reset to the version you selected. When your collaborators view this file, they'll see the version you selected.
Note: If you want to go back to the latest version of your document, open 'Revision history' and click Newer until you get to the latest version.


No comments:
Post a Comment